
Java Installation
In this article, we will learn about Java installation and write our first java program. Excited? Now, let’s begin.
The first step is downloading. We need to download the JDK(Java-Development-Kit). If you already have java installed in your system, you can verify it. In the case of Windows PC, you can search for the command prompt in the start menu and type the following in the command prompt:
$ java --version
If you have java installed on your PC, you will get something like this which depends on your version.

If you don’t have Java installed in your system, you can download it from here: Java SE – Downloads | Oracle Technology Network. This link will lead you to the official page of Oracle. You can go to JDK Download under Oracle JDK and then download the JDK according to your system requirements, i.e., whether you have Linux or Windows or macOS.
You should preferably download the .exe file for Windows.
For Linux, it does not matter which file you download since both are pretty easy to install. In .tar.gz, you need to extract the file but in .rpm, the Linux system installs everything automatically, but only the root user can install it.
For macOS, download the .dmg file.
After the download has been finished, you can verify it by comparing the space occupied by the downloaded file on your local drive with the size mentioned on the site. If they match, then congrats, your file has been downloaded perfectly. If not, then try deleting the downloaded file and downloading it again.
After this, the installation process starts.
Content
Java Installation for Windows PC
Step 1: Open the downloaded JDK file and follow the installation instructions until you reach the Finish button.
Step 2: Now your JDK has been installed. You need to set the JDK path to your system. Adding a path will permanently allow your system to access the program even when you reboot. For adding the JDK path, you need to navigate to the folder where your java has been installed. Generally, this path would be “C:Program FilesJavajdk-13bin” if not changed explicitly during installation. After navigating to the bin folder, copy the path from the address bar like this:

Now go to Start and search for environment variables. It will lead you to the “Edit the System Environment Variables” in the control panel.
Click the Environment Variables button. In the dialog box that opens now, you need to double click on the “Path” under System Variables in order to add a new path variable.
Now click on “New” and paste the copied path. Click on “OK” and you are done.
To verify that you’ve added the path successfully, open command prompt and type java. If you do not get any errors, then congrats, you have set the path successfully.
Java Installation for Linux
Instructions for .tar.gz
Step 1: Change to the directory in which you want to install java by typing cd directory_path_name. For example, if you want to install java in a directory called usr, you need to type cd /usr/java. If you want to install in this type of specific location you need to have root access to gain the necessary permissions.
Step 2: The .tar.gz archive file is also called a tarball. It is a file that can be uncompressed and extracted in a single step. Move the tarball to the current directory. Unpack the tarball and install the JDK by typing this:
$ tar zxvf jdk-13.interim.update.patch_linux-x64_bin.tar.gz
The JDK files are installed in a directory called jdk-13.interim.update.patch.
Step 3: Delete the .tar.gz file if you want to save disc size.
Instructions for .rpm
Step 1: First you must use the sudo command to install the .rpm file as root user.
Step 2: Install the package using the following command:
$ rpm -ivh jdk-13.interim.update.patch_linux-x64_bin.rpm
Upgrade the package using the following command:
$ rpm -Uvh jdk-13.interim.update.patch_linux-x64_bin.rpm
Step 3: Delete the .rpm file to save disc space. Exit the root shell.
Java Installation for macOS
Step 1: From Downloads, double click on the downloaded .dmg file. A Finder window appears with the name of the .pkg file.
Step 2: Double click on this JDK 13.pkg icon to start the installation. Click Continue and then Install.
Step 3: Enter the Administrator user name and password and click Install Software.
The software will get installed and a confirmation window will be displayed. After installation, you can delete the .dmg file to save disc space.
If you are still having some problems regarding the installation, then go through the “Installation instructions” mentioned in the above-mentioned Oracle website. The installation procedure has been given in greater detail and you will get all the help you need from there.
It will be helpful to understand the functions of some of the files installed and present in java in order to gain a piece of in-depth knowledge and understanding of the language. These are-
- Javac: As explained in the previous article, javac is the compiler of java language which generates the bytecode having extension .class. It is contained inside the bin folder which is the reason why we are adding this path extension in the path variables.
- jdk/bin: This folder contains the executables and command-line launchers.
- jdk/conf: This folder contains all the configuration files intended to be edited by developers, deployers and end-users.
- jdk/lib: This folder contains private implementation details of the runtime system and should never be modified.
- jdk/jmods: This folder contains all the compiled module definitions.
- jdk/legal: This folder contains all the copyright and license files for each module.
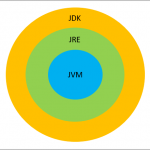
- jdk/include: This folder contains the C-language header files that support native-code programming with the Java Native Interface and the Java Virtual Machine (JVM) Debugger Interface.
IDE
Now that you have installed java in your system, your program will compile and run. But where should you write your program? This is the reason you need an IDE.
IDE stands for Integrated Development Environment. It provides us with a platform to write and edit our codes. Basically, it beautifies our code and makes it faster and easier for us to type and understand any code. It may/may not compile your code. The most commonly used IDE for Java is Eclipse. Cool name, huh? It also does some really cool stuff.
You can download eclipse from this website: Eclipse IDE for Java Developers
The installation of Eclipse is quite easy. If you are facing any problems during installation, you can refer to some videos or the install guide given under Related Links in the above downloads page.
If you do not want to use an IDE for writing codes, it is fine. You can also use Notebook for it. But let me remind you that all professional developers use an IDE for writing their codes.
After the installation, we are ready to write our first java program.
Hello World Program
We are learning a new language and so, it is mandatory to write the first “Hello World” program.
To write your first program in Eclipse, you first need to create a new java application which, in my case, I named “myApplication”. Then you need to create a new module and inside it, you need to create a class which I named “MyJava”.
To write your first program in Notepad, simply open Notepad, copy-paste the below code, save it as a .java file and you are done. In my case, I have saved my program under the name “helloworld.java”.
I have written the same code in Eclipse as well as in Notepad.

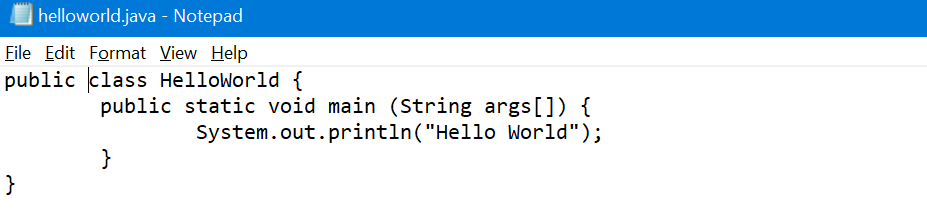
You can copy the code from here-
package myApplication;
public class MyJava {
public static void main(String args[]) {
System.out.println("Hello World");
}
}
If the above lines of code look terrifying and confusing to you, don’t worry. You do not need to understand all the details of the code right now. We will go through all of it part by part when the time comes. For now, just copy and paste the code to see the output.
If you have used Eclipse IDE, you can just run your program with the run icon present in the IDE itself since it uses the JDK and JRE already installed in your system.
If you have used Notepad to write your program, go to the directory where you have saved the java file. Open the terminal in this folder and type javac
If your program has run successfully, you will get the following output:
Hello World
If you get this output, congrats, you just executed your first java program! You have successfully completed the tedious process of installation of Java and executed your first Java program. Be happy for yourselves and give yourselves a long hug!
In the next article, we will start learning about the basics of java programming.
Еще об этом:
 JAVA TUTORIAL – РУКОВОДСТВО ДЛЯ НАЧИНАЮЩИХ
 Regression Testing With Testsigma
Core Java Interview Questions
Selenium Webdriver Installation
Selenium with Python Tutorial
Top Agile Methodology Interview Questions You Must Prepare
Introduction to Java
Regression Testing With Testsigma
Core Java Interview Questions
Selenium Webdriver Installation
Selenium with Python Tutorial
Top Agile Methodology Interview Questions You Must Prepare
Introduction to Java
 ТОП 40+ ВОПРОСОВ И ОТВЕТОВ НА ИНТЕРВЬЮ ПО JAVA В 2022 Г.
Java Basics | Core Concepts of Java Programming Simplified
Test cases for Online Shopping Application | Ecommerce Website Testing
ТОП 40+ ВОПРОСОВ И ОТВЕТОВ НА ИНТЕРВЬЮ ПО JAVA В 2022 Г.
Java Basics | Core Concepts of Java Programming Simplified
Test cases for Online Shopping Application | Ecommerce Website Testing