
Selenium Webdriver Installation
In this tutorial, we will set up our test environment to run the Selenium automation suite. We will install Java, download Eclipse, add Selenium jars to an Eclipse project, and then provide you a sample script to test the Selenium WebDriver installation.
Content
Selenium Webdriver Installation Steps
Following steps will guide you through setting up Selenium WebDriver on your machine-
Step.1. Configuring Java on a machine.
Download the latest version of the Java Development Kit(JDK) from Oracle.com. Follow the steps mentioned to install JDK. We are installing JDK as it will be required for developing and running our automation scripts which are nothing but Java programs.
Step.2. Download eclipse or any Java IDE of your choice.
Download the latest version of the Java IDE you would like to use, for Eclipse the download link is Eclipse.org. Select the appropriate version of Eclipse depending on your system type- 34 bit or 64 bit.

Step.3. Download Selenium WebDriver jar from the Selenium.dev website.
Go to the Selenium.dev website and under “Selenium Client & WebDriver Language Bindings”, click on ‘Download’ link for language Java.

Unzip the package and place it on any directory as a library folder.
Step.4. Creating a project and configuring Selenium jars.
- Launch eclipse.exe.
- Set your workspace to any location preferably other than C:(a workspace is a physical location where we store our project or group of related projects).
- Now create a new project- File->New->Project…->Java->Java Project.
- Name your project and click Finish.
- Now you will see an src folder under your project. Under this we need to create a package-Right Click src->New->Package (Basically these packages are used to group together related classes). Name your package e.g. ‘myTestPackage’.
- Inside this package create a new class and name it e.g. Test, your Test.java class will get created.
Step.5. Adding Selenium jars
This step is required for the Selenium installation in Eclipse. Right Click your project on the left and click on properties. A “Properties for {project name}” dialog box will appear. Click on “Java Build Path” on the left and then click on the Libraries tab on the right. In this tab click on the “Add External Jars..” button.

Now browse to the location where selenium libraries are placed (library folder Step#3). Make sure to add both the libraries-selenium-java-2.39.0.jar and selenium-java-2.39.0-srcs.jar along with the libraries present in the libs folder(selenium-2.39.0libs). The selected libraries will appear, click OK to add these libraries to your project. You can verify the same in the “Referenced Libraries” section under your project in the “Package Explorer” section on the left.
Step.6. Creating the first Selenium WebDriver project
Time to test the setup. Now, we will create our first selenium project, in which we will just open the Firefox browser and launch a website. The following steps are required to launch the firefox browser.
- Download geckodriver.exe from GeckoDriver Github Release Page. Make sure to download the right driver file based on your platform and OS version.
- Set the System Property for “webdriver.gecko.driver” with the geckodriver.exe path – System.setProperty(“webdriver.gecko.driver”,”geckodriver.exe path”);
Code snippet to launch the Firefox browser
package testPackage;
import org.openqa.selenium.WebDriver;
public class FirefoxBrowserLaunchDemo {
public static void main(String[] args) {

//Creating a driver object referencing WebDriver interface
WebDriver driver;

//Setting webdriver.gecko.driver property
System.setProperty("webdriver.gecko.driver", "{path to geckodriver}\geckodriver.exe");

//Instantiating driver object and launching browser
driver = new FirefoxDriver();

//Using get() method to open a webpage
driver.get("#");

//Closing the browser
driver.quit();

}

}
To run the test, right-click on Test.java file on the Package Explorer section, hover over “Run As” and select “Java Application”. Firefox browser will launch and open artoftesting.com.
That’s all we have in this post. Check out our complete Selenium WebDriver tutorial here – Selenium WebDriver – Complete Step-by-Step Tutorial. Thanks.
Еще об этом:
 100 САМЫХ ПОПУЛЯРНЫХ ПРОДВИНУТЫХ ВОПРОСОВ И ОТВЕТОВ НА ИНТЕРВЬЮ ПО SELENIUM
 КАК ОБРАЩАТЬСЯ С ВЫПАДАЮЩИМ СПИСКОМ И МНОЖЕСТВЕННЫМ ВЫБОРОМ, ИСПОЛЬЗУЯ SELENIUM WEBDRIVER
 РУКОВОДСТВО ДЛЯ НАЧИНАЮЩИХ ПО ИСПОЛЬЗОВАНИЮ APPIUM С NODEJS ДЛЯ АВТОМАТИЗИРОВАННОГО ТЕСТИРОВАНИЯ ПРИЛОЖЕНИЙ ДЛЯ ANDROID
 РУКОВОДСТВО ПО SELENIUM PYTHON ДЛЯ НАЧИНАЮЩИХ
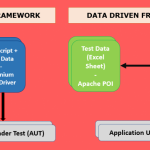 СТРУКТУРА, УПРАВЛЯЕМАЯ ДАННЫМИ, В SELENIUM WEBDRIVER | МАТЕРИАЛ ДЛЯ ТЕСТИРОВАНИЯ ПРОГРАММНОГО ОБЕСПЕЧЕНИЯ
Launching Browsers in Selenium
Regression Testing With Testsigma
Selenium WebDriver Commands
СТРУКТУРА, УПРАВЛЯЕМАЯ ДАННЫМИ, В SELENIUM WEBDRIVER | МАТЕРИАЛ ДЛЯ ТЕСТИРОВАНИЯ ПРОГРАММНОГО ОБЕСПЕЧЕНИЯ
Launching Browsers in Selenium
Regression Testing With Testsigma
Selenium WebDriver Commands
 SELENIUM 4.0 — ВВЕДЕНИЕ, НОВЫЕ ФУНКЦИИ, УСТАНОВКА, ЧТО УСТАРЕЛО
Selenium with Python Tutorial
SELENIUM 4.0 — ВВЕДЕНИЕ, НОВЫЕ ФУНКЦИИ, УСТАНОВКА, ЧТО УСТАРЕЛО
Selenium with Python Tutorial