
Regression Testing With Testsigma
Nowadays, meeting the customer demands, requirements and working on feedback provided by them are the top priorities for any business to flourish. To stay competitive in the market and bring changes in the application as per customer needs has become the new way of attracting new and holding old customers.
Any changes in the application lead to testing of old features to test new changes that have not impacted any old feature. This is called Regression testing.
As the changes have become so frequent, Regression testing also has to be performed often. For QA, Regression testing is the most boring task and time-consuming activity with the same set of cases to execute every time any change is done.
So it is always good and wise for an organization to automate regression suite as it helps save a lot of effort and time. Automating Regression suite also provides wider coverage and faster releases.
In this blog, we will be discussing how to automate regression cases using the Testsigma tool. Testsigma is a powerful AI-based tool that uses normal English language to write code making it easy and understandable for everyone.
Content
Steps to Automating Regression suite using Testsigma
- Select all test cases which can be automated and Prioritize them.
- Make a Regression package which covers all functionality.
- Capture all the xpath of the application and store it.
- Write the steps of automation test case in simple english language
- Execute test cases across all platform
- See automation run status
- Incase of any failure analyze it and raise a variance for it.
Here is a step-by-step guide to successfully run your automation test for Regression using the Testsigma tool.
1. Create a project
Create a project with a relevant name under test sigma. This project will be responsible to hold all test cases related to the regression suite of the project.

2. Under project import test cases under Test suite for regression
Create multiple test cases testing different functionalities to provide wider coverage in the test suite section under the project. Each Test case should be crisp and clear. Each test case should be designed in such a way that each step has an objective to fulfill and the final result serves the purpose. The test suite can be created by clicking the ‘Create’ button in the test suite section.
As soon as you click on create a page will be displayed with additional information about the test suite.
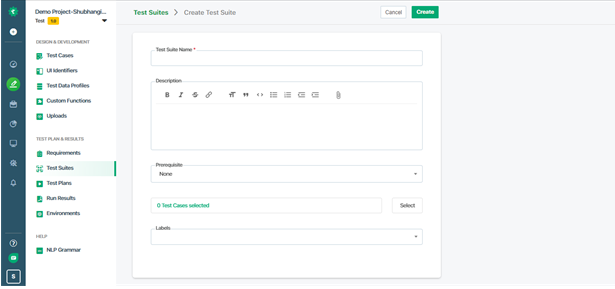
i. Test Suite Name: it is a mandatory field and provides a relevant name that helps users understand what is the purpose of this test suite.
ii. Description: It is not a mandatory field but it is always a good practice to give a short description to the suite to make it more clear. It helps understand anybody accessing the suite why this suite was created and what it would be testing.
iii. Prerequisite: if any prior requirement is to be fulfilled to run the suite mention it else mark it as none.
For example, the test case is only specific to IOS, the Mark is as IOS only.
iv. Test Case: You can select the test case which you want to run in the designed test suite.
v.Labels: Labels play a very vital role when execution comes into play. You can select the filter as to which category of cases you want to run. The test cases related to labels can be executed.
To provide a better understanding of how TestSigma can make our automation job easier, We would be demonstrating a small example. This example would help us on providing a clear and better picture of how to perform regression testing using Testsigma tool.
Before we start automating let’s have a brief overview of the flow of the application.
Url to be used: https://www.saucedemo.com/index.html
Example: The User Interface (UI) of the application has changed. We need to check the functionality of buttons on each page to verify that previously existing functionality works fine.

Application to be tested overview
Test case:
Step 1: Hit URL: https://www.saucedemo.com/index.html
Step 2: Enter a user name
Step 3: Enter Password
Step 4: Click Login
Step 5: Verify Products page is displayed
Step 5: Add an item to the cart
Step 6: Click on the cart
Step 6: Verify Your Carts page is displayed
Step 7: Click Checkout Button on Your Carts Page
Step 8: Verify Your Information page is displayed
Step 9: Enter First name
Step 10: Enter the Last name
Step 11: Enter Postal code
Step 12: Click the Continue button on the Your information page
Step 13: Verify checkout Overview page is displayed
Step 14: Click on the Finish button on the Overview page
Step 15: Verify Finish page is displayed.
Each field on the web page is known as web elements. Each web element has a unique locator that helps trace the field and enter values into it.
The data is the fields are entered with the help of locators.
Test data to be entered in the above test case step :
Step 2: standard_user
Step 3: secret_sauce
Step 9: Shubhangi
Step 10: Mishra
Step 11: 400000
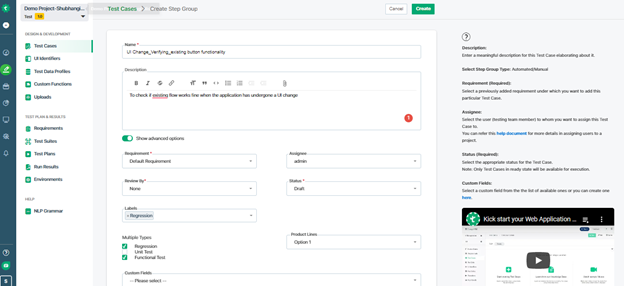
3. Click on the create button and enter all details
TestCase Name: Give a meaningful name to the test case, it is always good to give a name as per the objective of test case
Description: Add a small description of why a test case is required to be added.
Label: should be entered as ‘Regression’. While running a test case if you have to run only regression it comes easy to figure regression cases.
Requirement: Map the requirement for which test case is being created. It is always a good practice to map requirements as details are
4:.Capture all UI identifiers.
Each Object such as button, link, input fields is referred to as UI identifiers in the Testsigma tool.
The UI identifier in the Testsigma tool can be located in three ways.
i. Record: The record option is one of the best features of the Testsigma tool. This option helps in fetching the location of the element on the page by just clicking on the element. The record option doesn’t mimic the actions performed on-page, it just helps in extracting the locator value.
ii. Create: You can also create your own unique UI identifiers by clicking on the create button and entering relevant UI identifiers with their values
UI identifier is the locator value to locate that particular web element. The locator can be Classname, ID, XPath, link text, name, CSS selector. The locator can be fetched by right-clicking on the web elements and inspecting them.
iii. Import: Values of UI Identifiers can be stored in the external excel sheet and imported by clicking the import button and providing values of the locator in the test cases.

5. Create a test case in the tool to test the functionality
Create automation test cases by passing test data and relevant locator values to get the desired result. TestSigma being an AI-based tool while typing in test steps it auto-suggests keyword/test steps to write that reduces the complexity of automation scripting. Majorly to test a web application below mentioned 4 major actions are required.
- Navigate to the url to be tested:
Example: Navigate to https://www.saucedemo.com/index.html
This step helps to land on the specified URL which needs to be tested. After entering the URL, click on create, verify that step is created.
- Enter test data in all required input text fields in an application.
Example: Enter test data in the UI identifier field.
This step is to enter values to all web elements which require input as text. The below-mentioned steps are written in the Testsigma tool to check the end-to-end functionality when the website has undergone a change.
Test data can be provided while implementing the step, In the below step mentioned standard_user is the data to be passed in the username field.
- Verify Desired page
Example: Verify that the element ProductPageHeader is displayed
Verify the desired page is displayed, by determining the correct element is displayed on performing any action on the page. This step is to validate whether the flow is as per business requirements or not.
- Click to perform desired action
Example: Click on Finish_Button
This step helps to check if or not the button is functioning and yielding the desired result or not.
The below script is written in Testsigma tool to check the functionality of the test case mentioned in the test case section. The code is as simple as writing a manual test case where each step has an objective to serve.
Step 1: Enter standard_user in the Username field
Step 2: Enter secret_sauce in the Password1 field
Step 3: Click on LOGIN
Step 4: Verify that the element ProductPageHeader is displayed
Step 5: Click on ADD TO CART
Step 6:Click on Checkout
Step 7: Verify that the element YourCartHeader is displayed
Step 8: Click on CheckoutButtononYourCartpage
Step 9:Verify that the element YourInfo_Header is displayed
Step 10 : Enter Shubhangi in the FirstName field
Step 11 : Enter Mishra in the LastName field
Step 12 : Enter 40000 in the PostCode field
Step 13 : Click on Continue_Button
Step 14 : Verify that the element OverviewPage is displayed
Step 15 : Verify that the element YourInfo_Header is displayed
Step 16 : Click on Finish_Button
Step 17 : Verify that the element Finish_Page is displayed
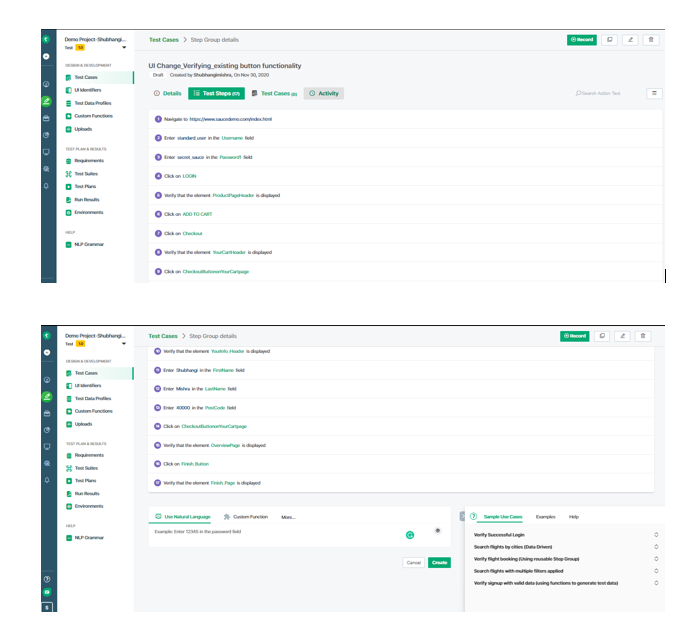
Snapshot of the above test step written in test sigma tool.
6. Test execution
Test execution is to analyze the expected and desired outcome is the same. Testsigma has a powerful inbuilt cloud-based test execution tool that helps you run test scripts on multiple platforms. To enable test execution via the Testsigma tool you just need to install the plugin.
As soon as you click on the run test case button a window will popup. This enables you to select the test lab where you want to run your case, the Operating system, the browser, the version of the browser, the capability to save the screenshot for each step.

Running in Different browsers and operating systems
Testsigma has a powerful in-built test execution tool. The tool makes the entire execution process easy and simple.
It allows you to run your test scripts on multiple browsers and operating systems with just a single click. You can choose the browser and operating system of your choice during runtime.
This makes testing hassle-free as there is no need to download any drivers for the browser. Neither do you need VM ware to execute test cases on multiple platforms.
The Operating systems supported by the Testsigma tool are Linux, Windows, and Mac. you can also select different versions of windows such as 7, 8, 10, etc.
The Browser supported are Chrome, Firefox, and Internet explorer.
Analyzing the result of test case run in case of test case failure
If the test case failed due to any reason. The tool provides a detailed report and analysis of the run. The report specifies the reason behind failure, how many steps were executed and passed, failed, and how many steps did not execute. On top of that, the entire run video is recorded which makes it easier to determine what went wrong during the execution.

Failed test step Analysis report
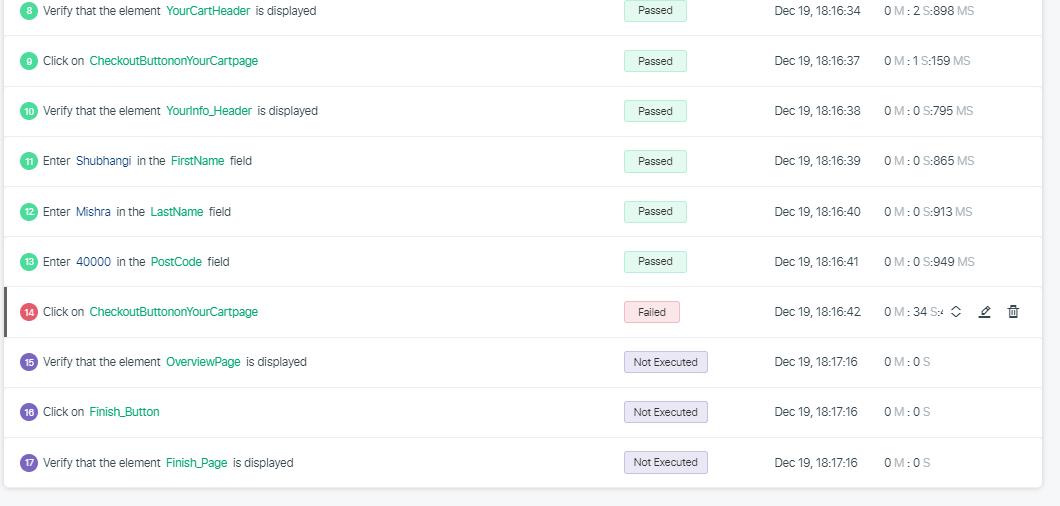
The step where it failed.
Reporting defect in case of failures
You can directly report the failure from the tool itself. The report bug feature is integrated with Jira tool that helps you raise defects by just providing the comments. The screenshots, logs, and video that was taken while test execution by the Testsigma tool is directly attached when reporting a bug.
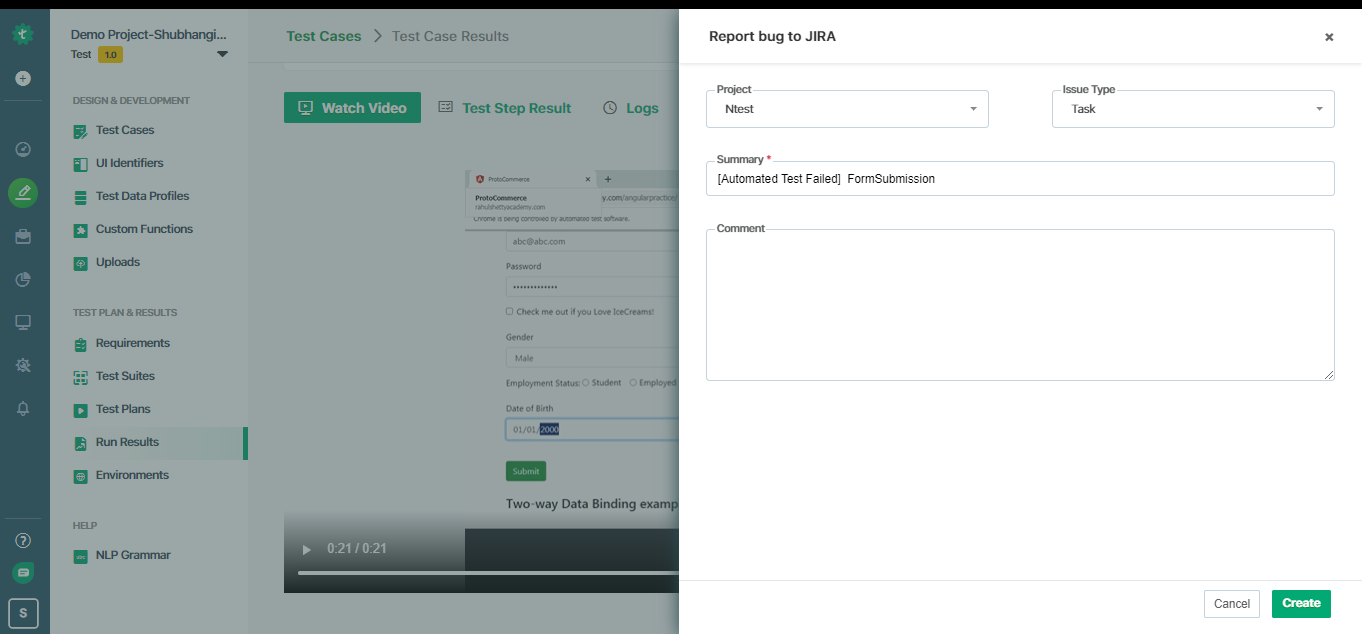
Reporting bug via Testsigma in case of failures.
Analyzing the result of test case run
When test execution is complete the screen gets displayed with the test result. The Testsigma execution tool not only captures screenshots but also makes the video of the entire test run. This makes it very easy and convenient to showcase your outcome to the business analyst with just a video. BA are all happy as they are only interested in the end result.
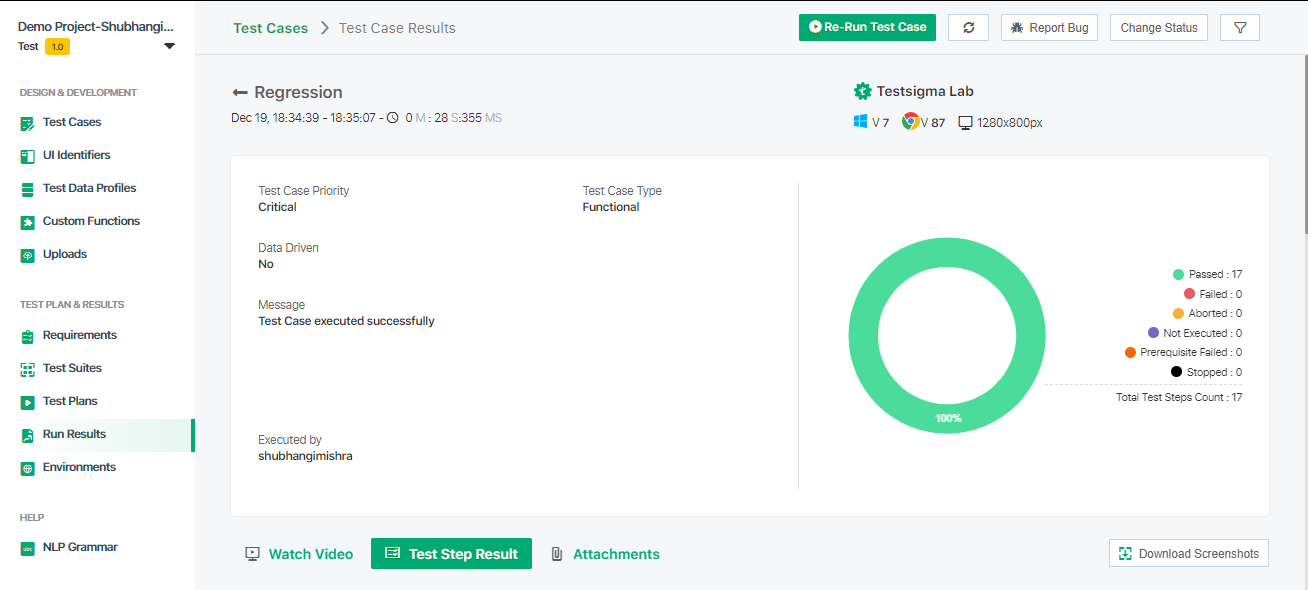
Test execution run status
We can also download videos, logs, and screenshots from the tool that can be used for future reference.
TestSigma is a dream tool to be used by any Automation tester as it serves all the requirements that the tester looks for. The application can be made to run on several platforms without making any change to the code base or installing any software.
The tool not only makes the task of a tester easy but also makes automation learning very easy for someone who is new to automation. You can make any non-technical person also understand the entire requirements and their outcome just by showing the execution report and video.
Еще об этом:
 Manual Testing Interview Questions and Answers
Types of Testing | Software Testing Types Every QA Should Know
Regression Testing
Use Case Testing – The Complete Guide
10+ Best A/B Testing Tools To Boost Your Website’s Performance
What is Automation Testing?
Top Agile Methodology Interview Questions You Must Prepare
What is Manual Testing?
Compatibility Testing
Mobile App Testing – The Complete Guide with Checklist
Manual Testing Interview Questions and Answers
Types of Testing | Software Testing Types Every QA Should Know
Regression Testing
Use Case Testing – The Complete Guide
10+ Best A/B Testing Tools To Boost Your Website’s Performance
What is Automation Testing?
Top Agile Methodology Interview Questions You Must Prepare
What is Manual Testing?
Compatibility Testing
Mobile App Testing – The Complete Guide with Checklist