
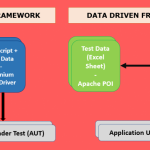
Data Driven Testing with TestSigma
Every test framework requires some test cases which in turn requires input Test Data to perform large-scale software testing. With the increasing number of data points being collected per user, it becomes very important to carefully craft your Test Data to get accurate and optimal results. It might be a very hefty task to incorporate a large amount of Test Data with the Test Cases manually.
Testsigma provides you with a plethora of tools and features which allow you to incorporate Test Data through external sources and helps you to get started with Data Driven Testing with TestSigma. Let’s peek into some of these features.
- It helps you to create and handle your test data seamlessly using Test Data Profiles.
- It allows you to import test data from different sources such as csv, json files or you can add them manually.
- You can replace the hard-coded Test Data in your test cases with parameter names from different Test Data Profiles in plain English.
- You can expand your coverage by including both positive and negative Test Data.
Without any further ado, let’s dive deep into some simple and easy steps to get you started with Data-Driven Testing using Testsigma.
Content
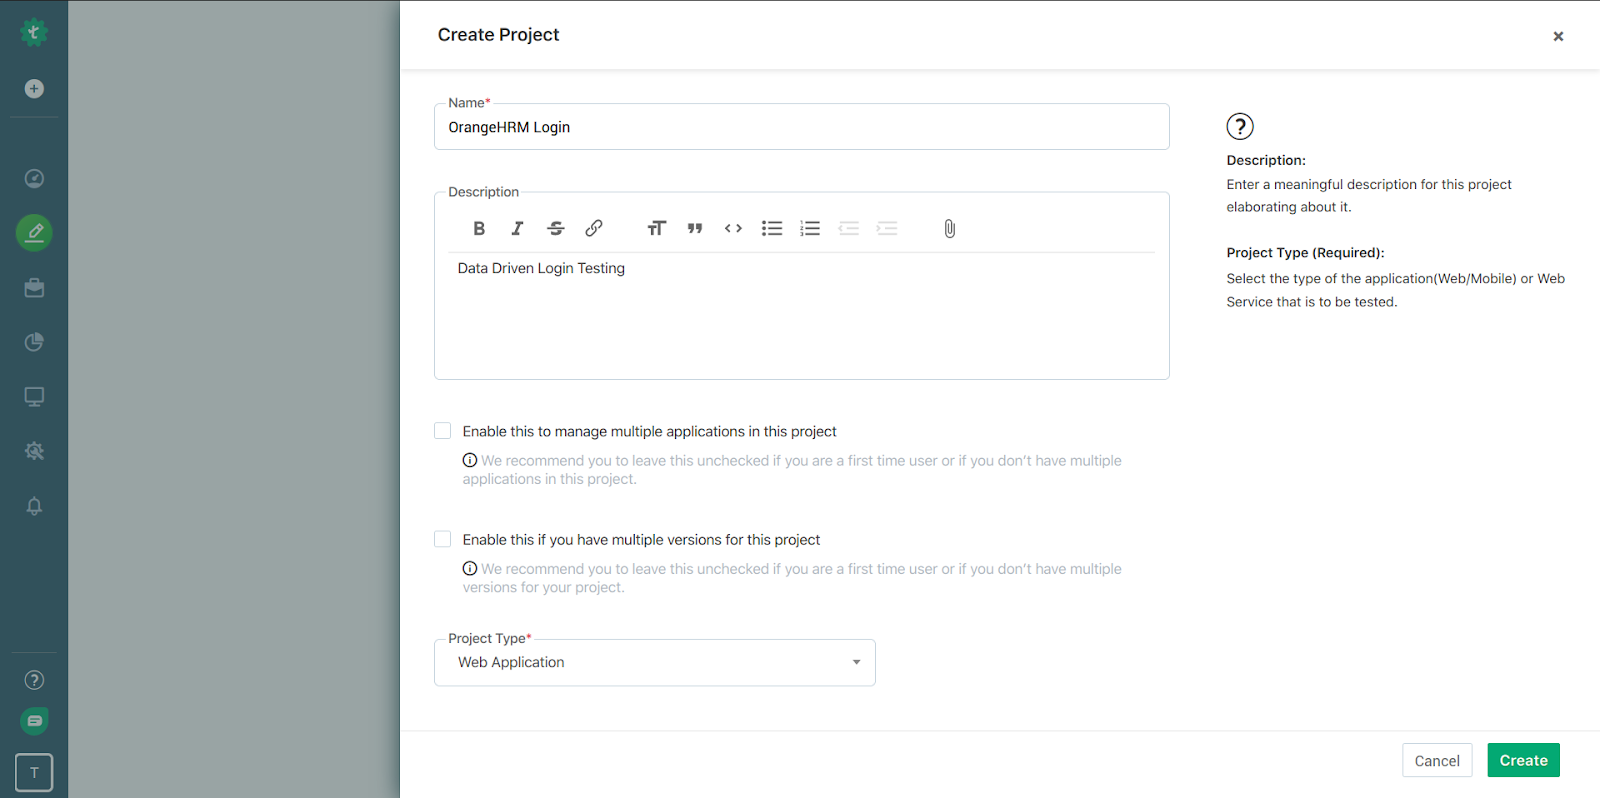
Creating a New Project
To get started with Data-Driven Testing using Testsigma, you need to have an account with Testsigma. After you have created the account, you can dive straight into creating a new project by logging in.
To create a new project – on the top left corner of the page, select the create new project tab. Fill in the required details such as name of the project, description and type of the project (Website, Mobile App, etc.).
In this article, we are going to create a simple Data-Driven Testing environment for logging into the OrangeHRM open source website.
Creating Test Data Profiles
After you have created a new project, you now need to create the Test Data Profile. It allows you to enter the testing input parameters. There are 3 ways to create a Test Data Profile.
- Using JSON Object Format.
- Using Test Data Table Entry.
- Importing from an Excel file.
- Go to the Test Data Profile Tab on the menu bar located on the left side of the page.
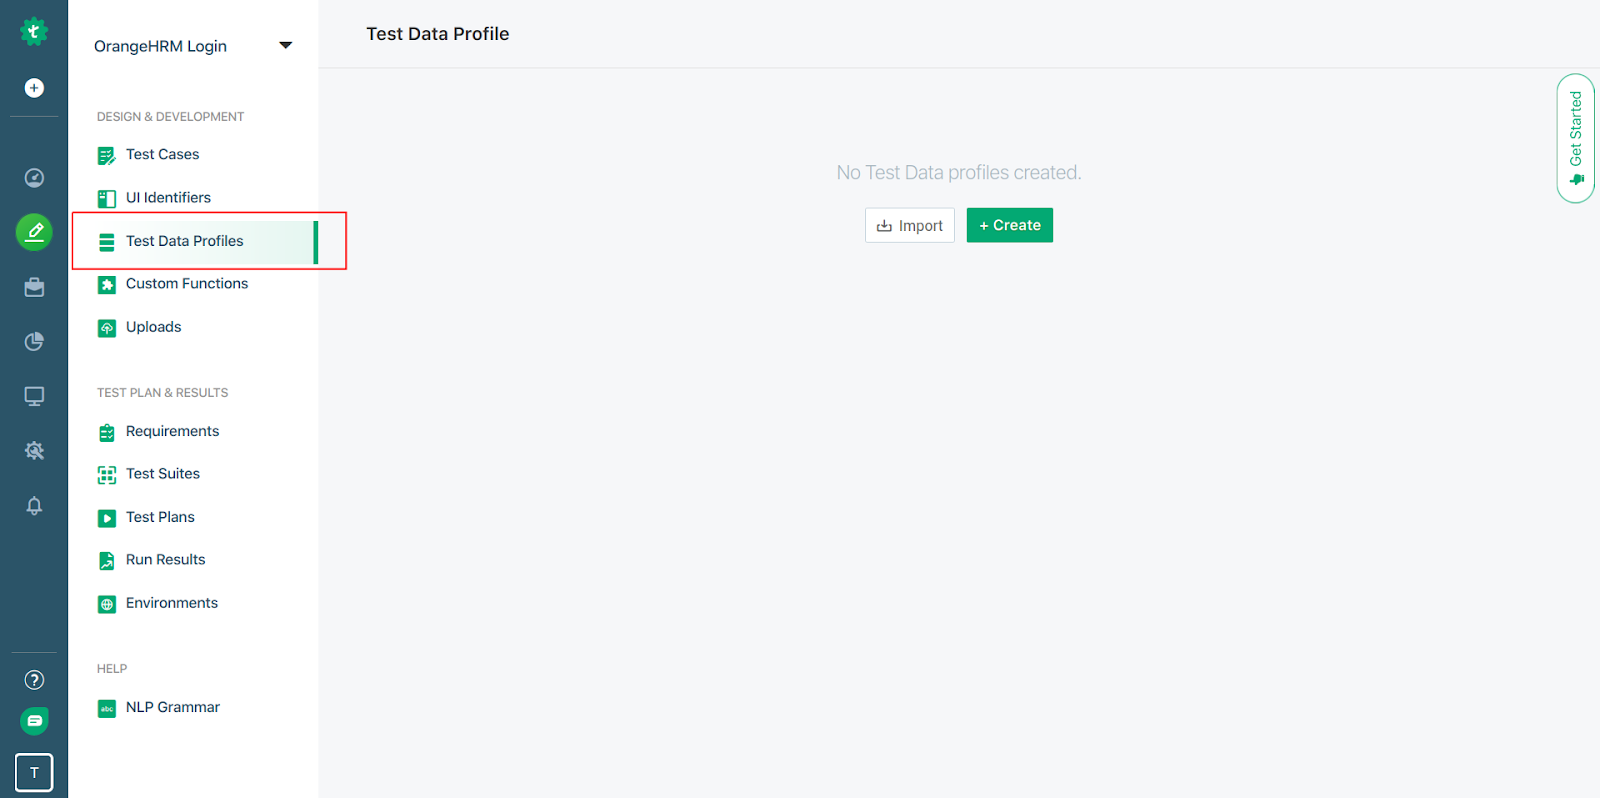
- To import a Test Data Profile from an Excel Sheet, you can click on the Import button. It also provides you with a sample Excel Sheet to verify the format.
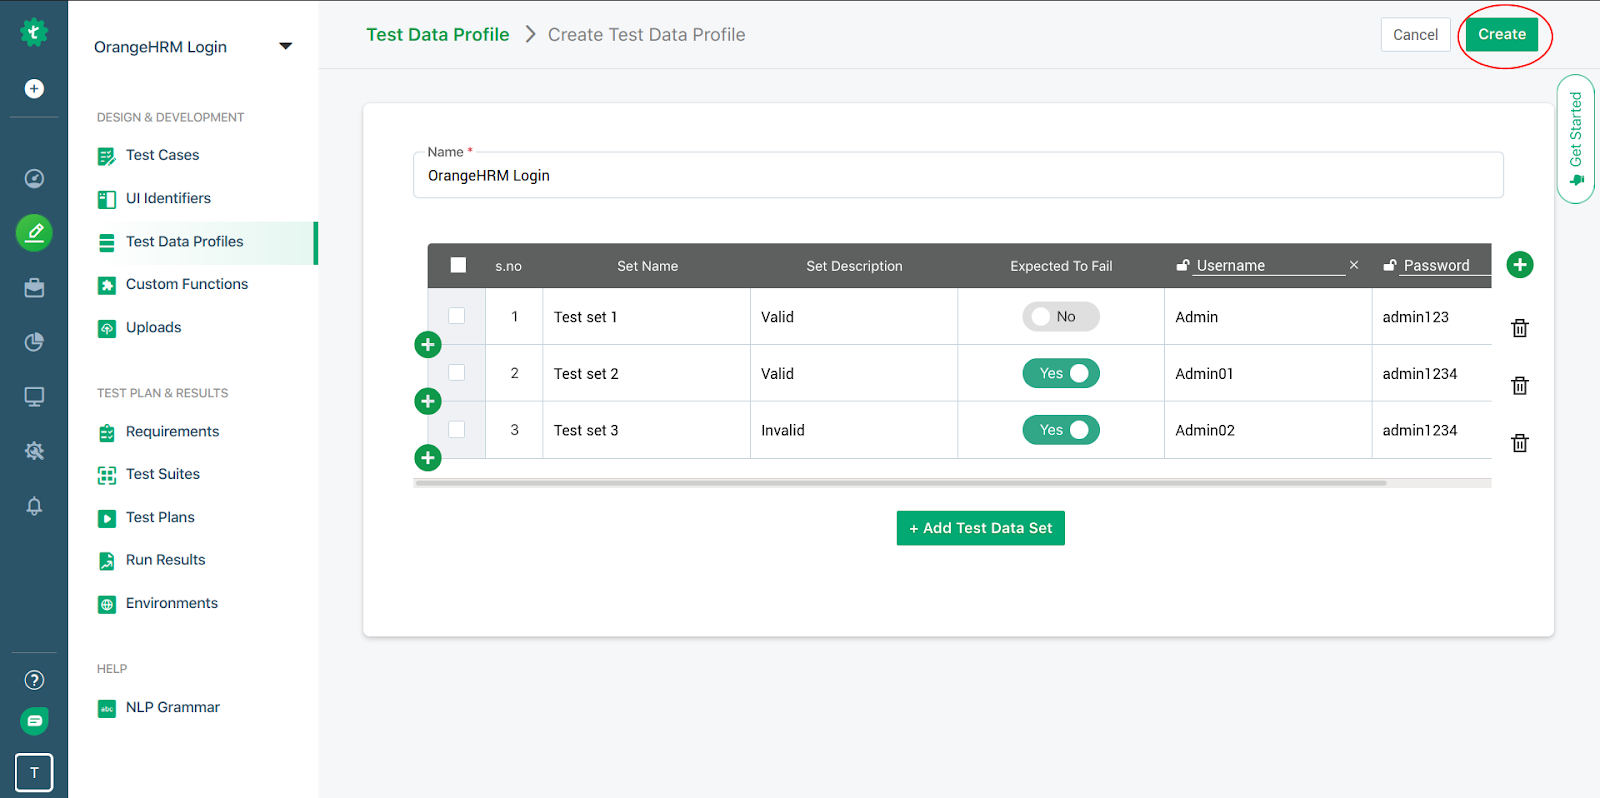
- We are going to use the Test Data Table Entry method to create the Test Data Profile. Click on the Create button.
- You can now enter the Test Data along with the parameters that would be used in your testing process. For our example, we need Username and Password to test the login process.
- It allows you to add more parameters by clicking on the plus (+) button at the end of the last column.
Most developers ignore negative testing which is an essential part of the testing phase. You can perform negative testing by toggling the “Expected to Fail” button. After you are done, click on the create button to create the Profile.
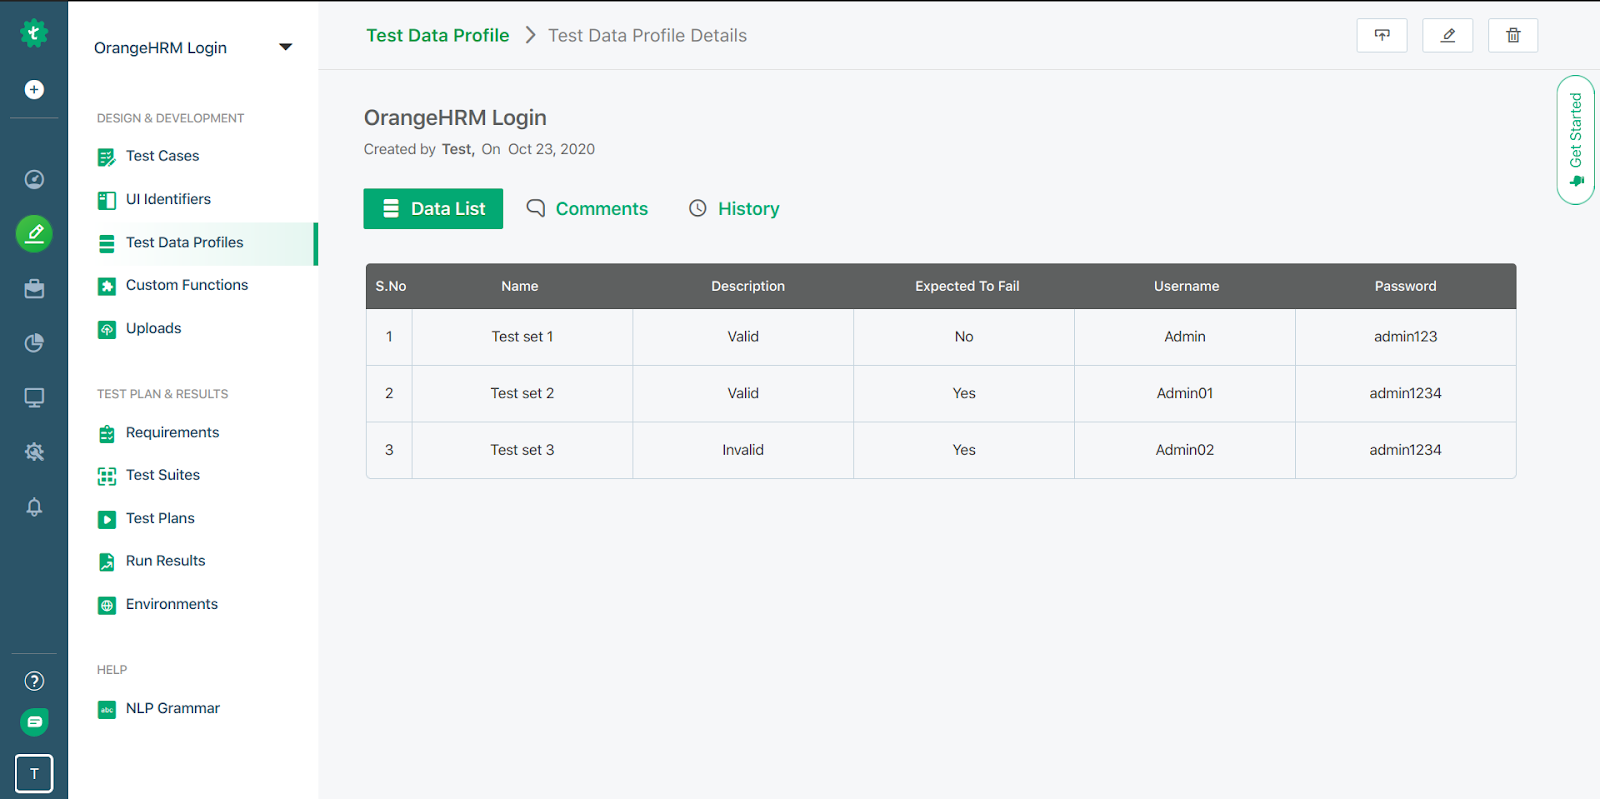
After you have created the Test Profile, you will now be able to see all the rows of Data along with the input parameters. You can also add comments and view the history of changes using the respective tabs.
Creating UI Identifiers
When you will build the Test Cases in the next step, it would require you to enter UI Identifiers. Using these UI Identifiers, you will be able to place the right Input Data to the Input Field.
Testsigma allows you to create multiple types of UI Identifiers including CSS Selectors, IDs, Classes, etc. You can also use the Testsigma chrome extension to automatically identify the Identifiers for you.
Click on the UI Identifiers tab on the left sidebar and click on the Create button.
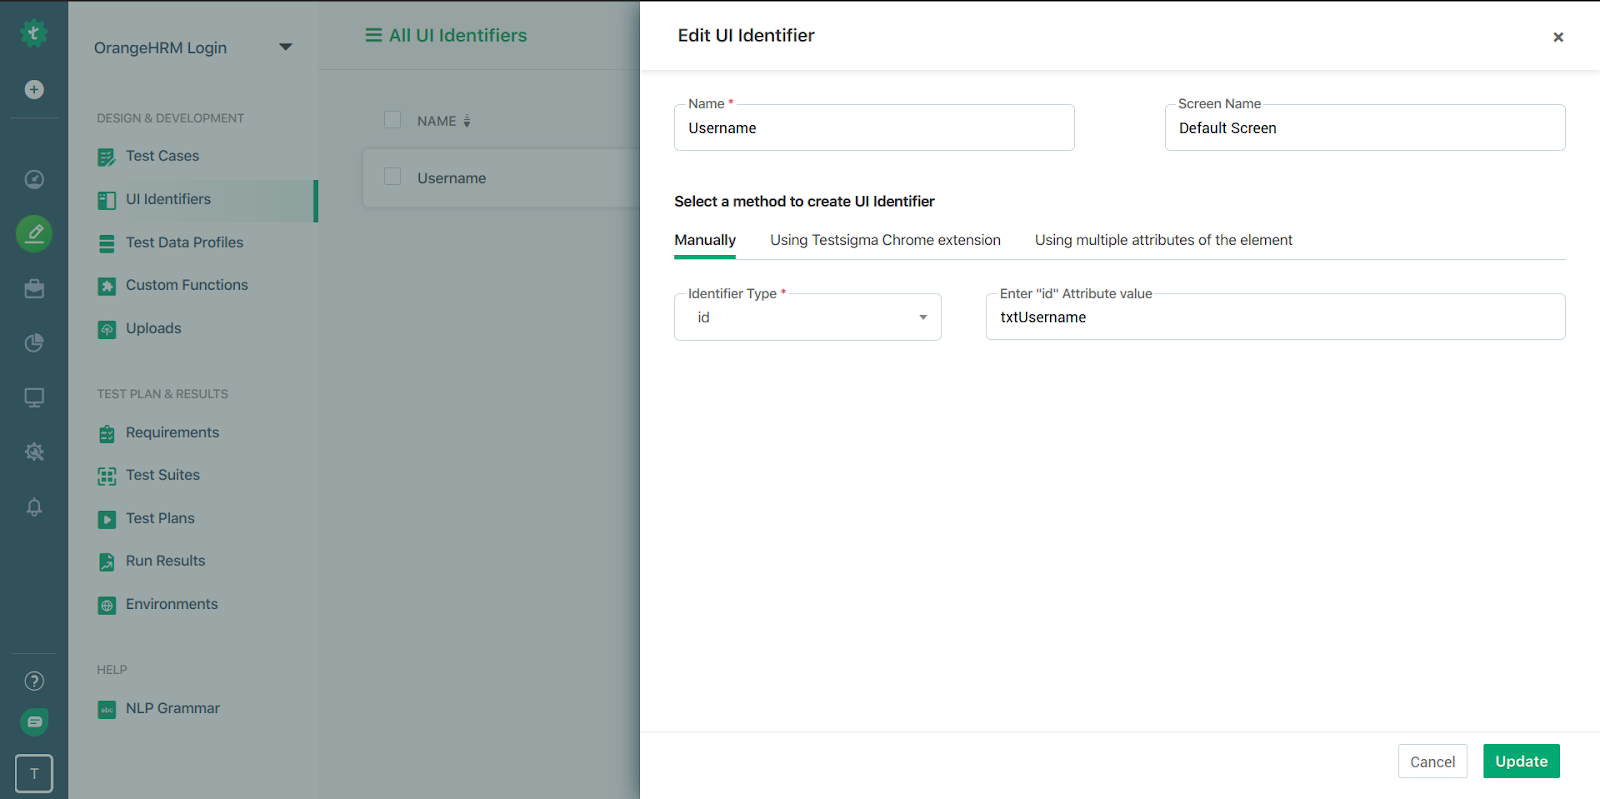
Here, we have created two identifiers called Username and Password using their CSS Ids.
Creating the Test Requirements
Go to the Requirements tab on the left sidebar and click on the Create button to create a new Requirement. Here, you can enter your specific requirements such as the number of manual test cases, Type of testing, Start and Completion dates, etc.
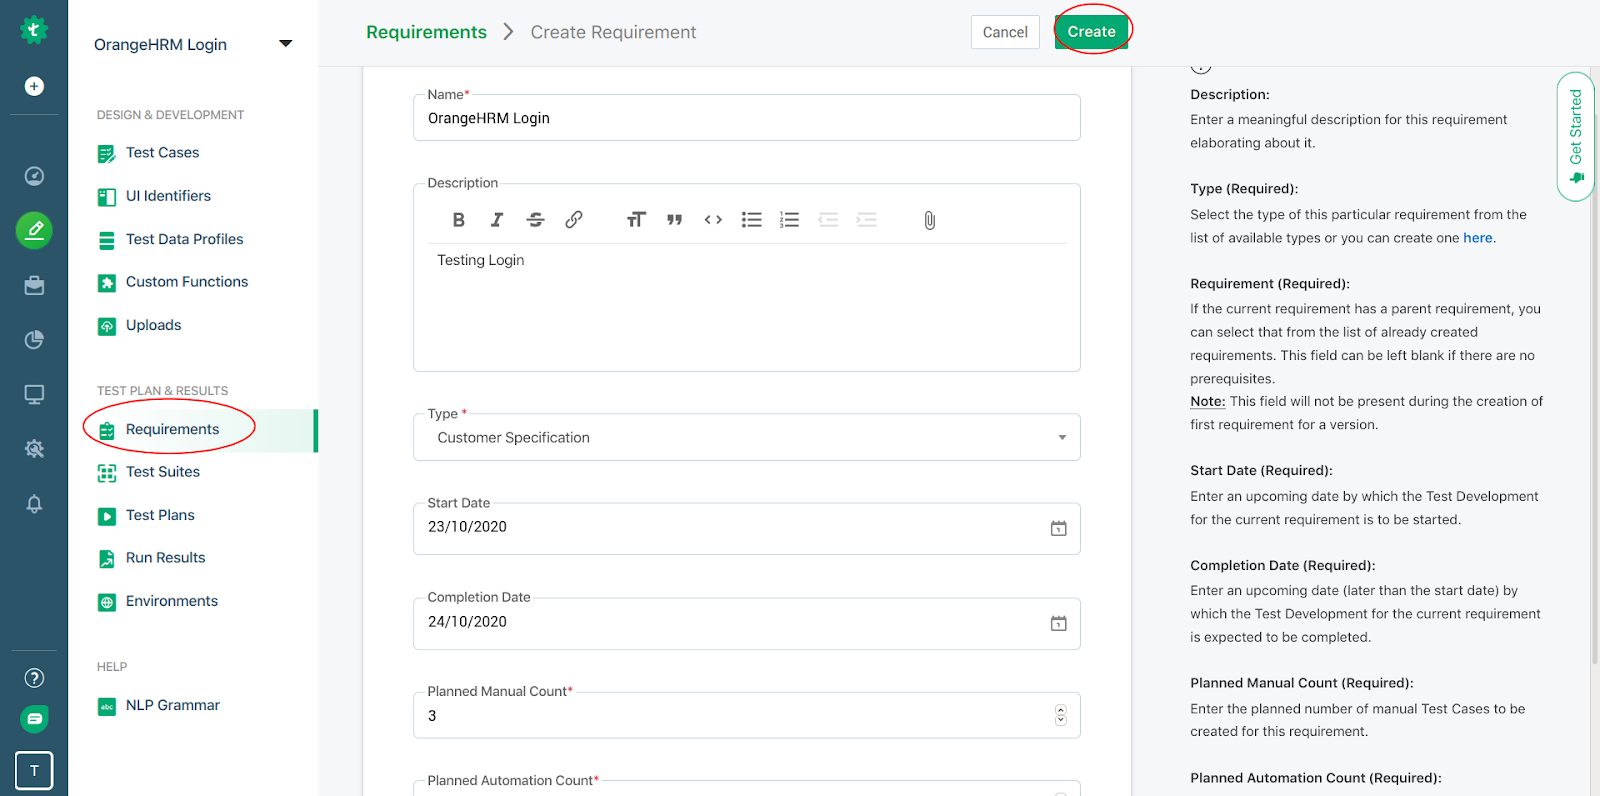
After you have filled all the details, click on the Create button.
Creating Data-Driven Test Cases
After you have created the Test Requirements, you can now build your Custom Test Cases in plain English by clicking on the Create Test Case button on the same window.
Enter the name and description of the Test Case and toggle the Advanced Options button.
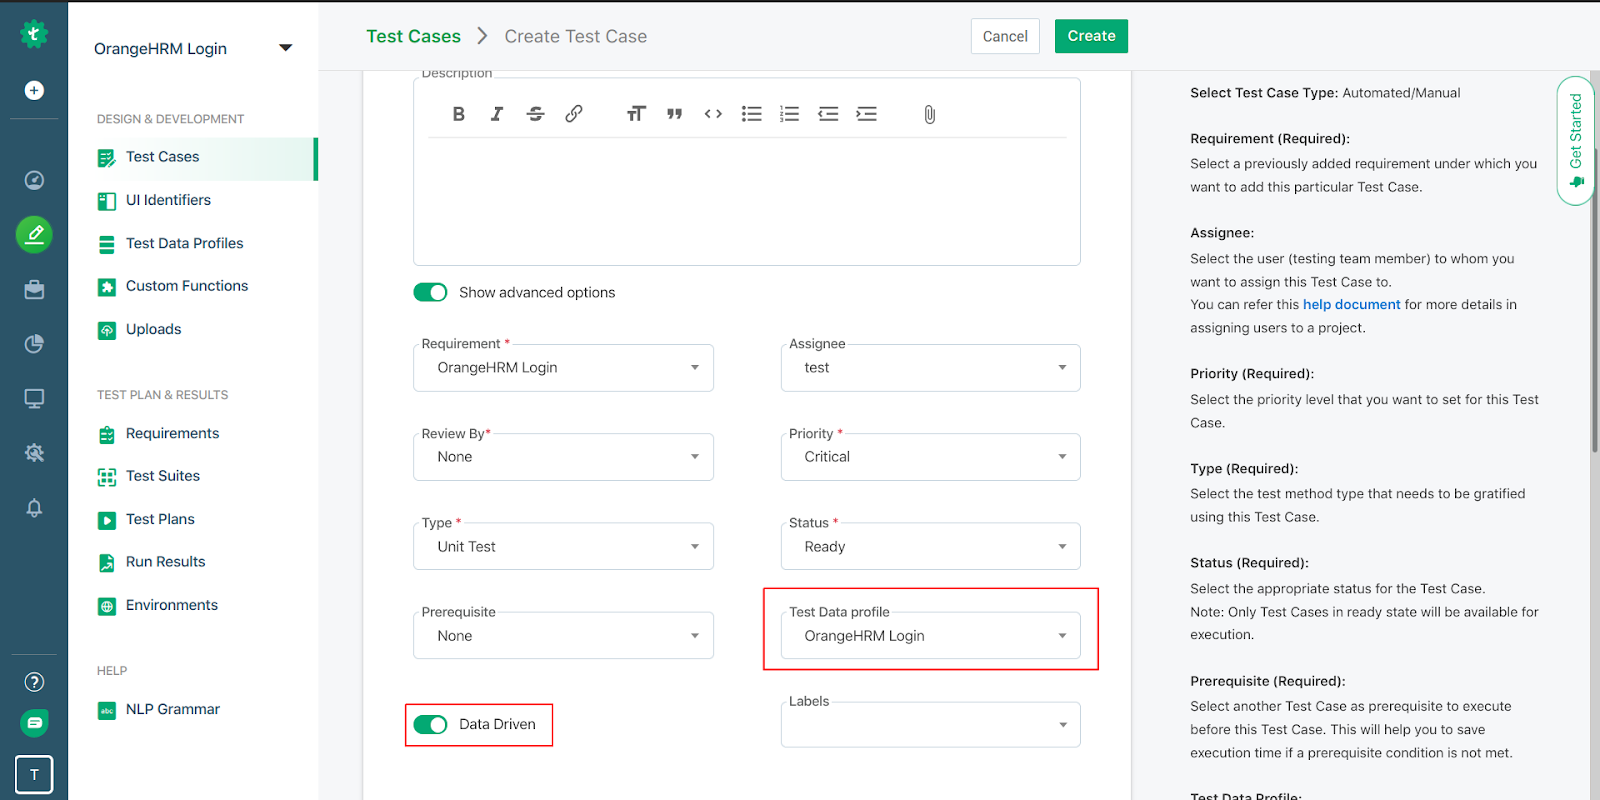
Here, make sure that you have selected the appropriate Test Data Profile and toggled the Data Driven option in order to make sure that it takes the Data from the Data Profile that you have mentioned and perform the Testing. Click on the Create button to proceed with building the Test Cases.
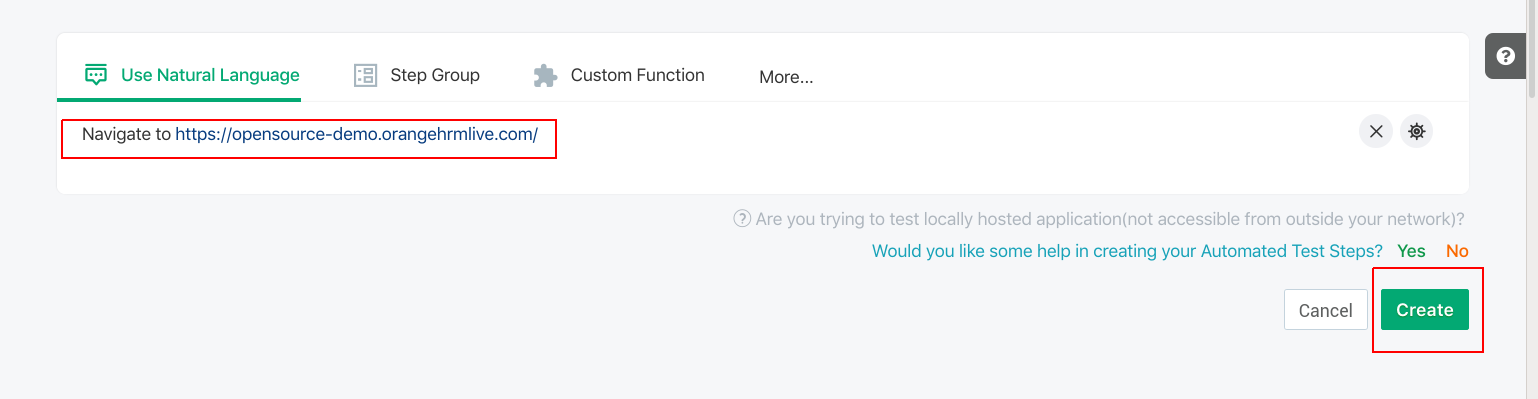
Using the Test Data from the Test Data Profile to create Data Driven Test Steps
We will now use the Test Data from the Profile and the UI Identifiers that we had created in the previous steps to create our Test Cases in plain English.
- To navigate to the Test URL, simply use the following statement and click on the Create button.
- Now, to create a step for data input in the text boxes, start writing “Enter ..” in the box and you will get a list of several Natural Language Statements.

You can choose the one as per your requirement. We will be using the first one as we need to deal with UI Identifiers.
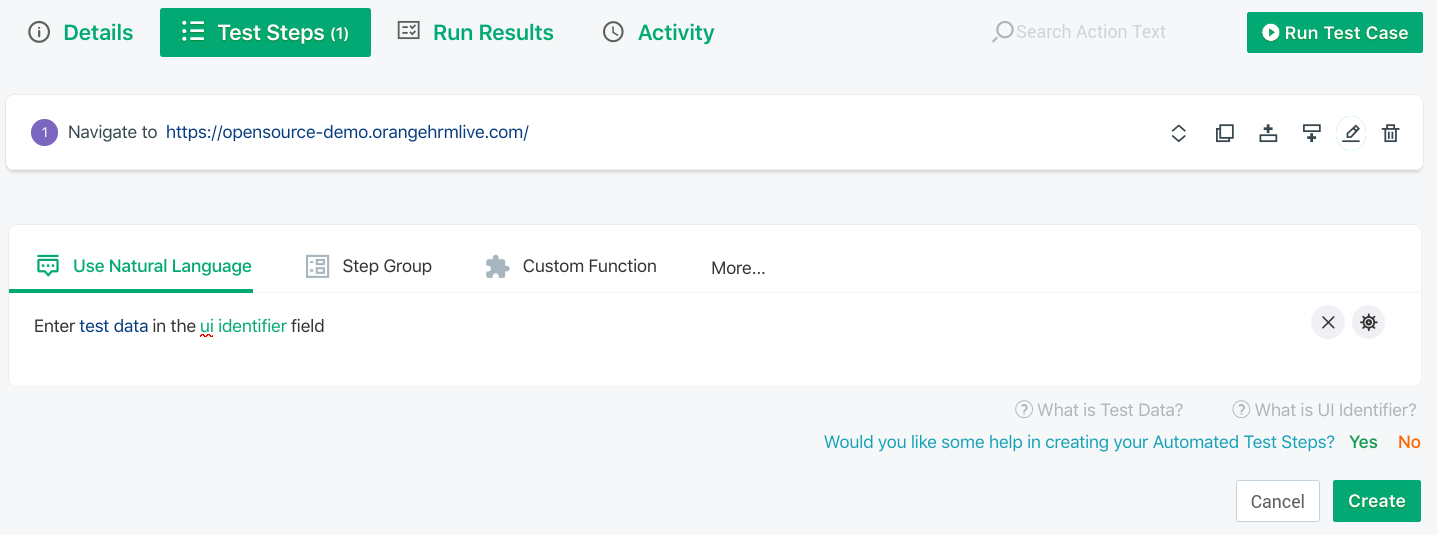
You can now add input parameters and UI Identifiers and your final statement will be similar to the one in the following image.
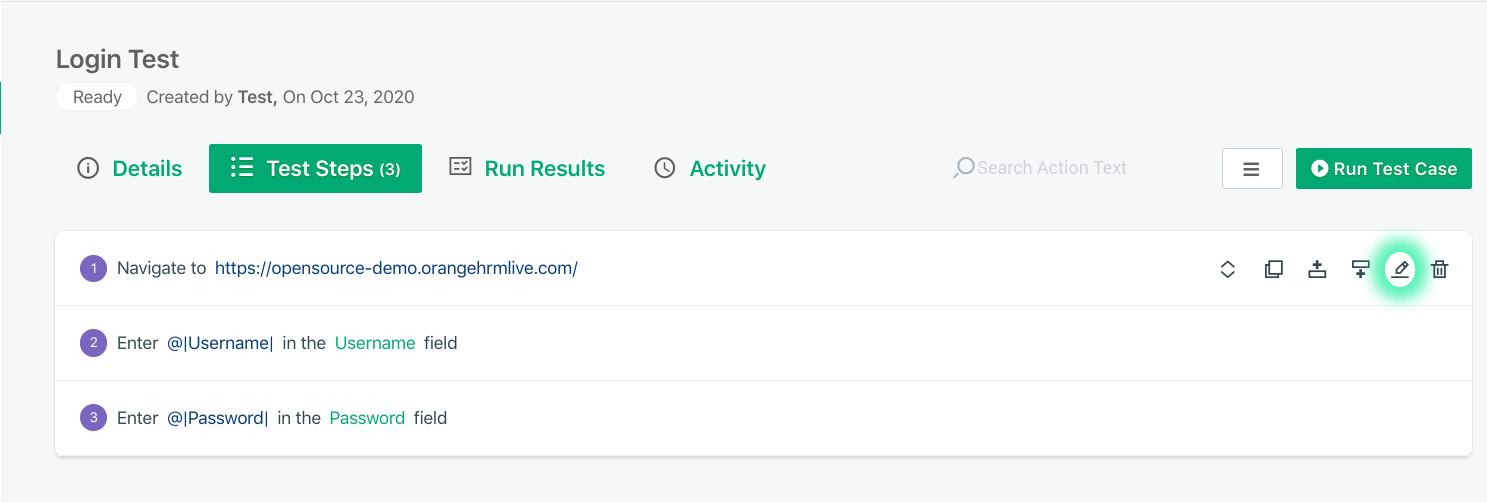
We can see how using the Input Data from our Data Profiles, we can create Test Steps and build a perfect Data-Driven Testing Sequence that would automatically perform the Data-Driven Testing on clicking the Run Test Case button.
Executing the Data-Driven Test Case
After you have included all your Test Steps, you can click on the Run Test Case button to run the Test Case.
Testsigma provides you with 3 different Execution methods.
- Dry Run to execute a single Test Case quickly.
- Quick Run to execute a set of Test Cases without creating a group.
- Parallel Execution to execute multiple Test Cases and/or Test Suites parallelly.
Let’s go ahead with the Dry Run method to execute our Data-Driven Test Case. It will prompt you to input certain Testing Configurations like the Test Lab, OS Versions, Browser Type, Screen resolutions, etc. You can also set the platform where you want to run the execution and also for which conditions you want to capture the screenshots. After filling all the details, click on the Create and Run button.

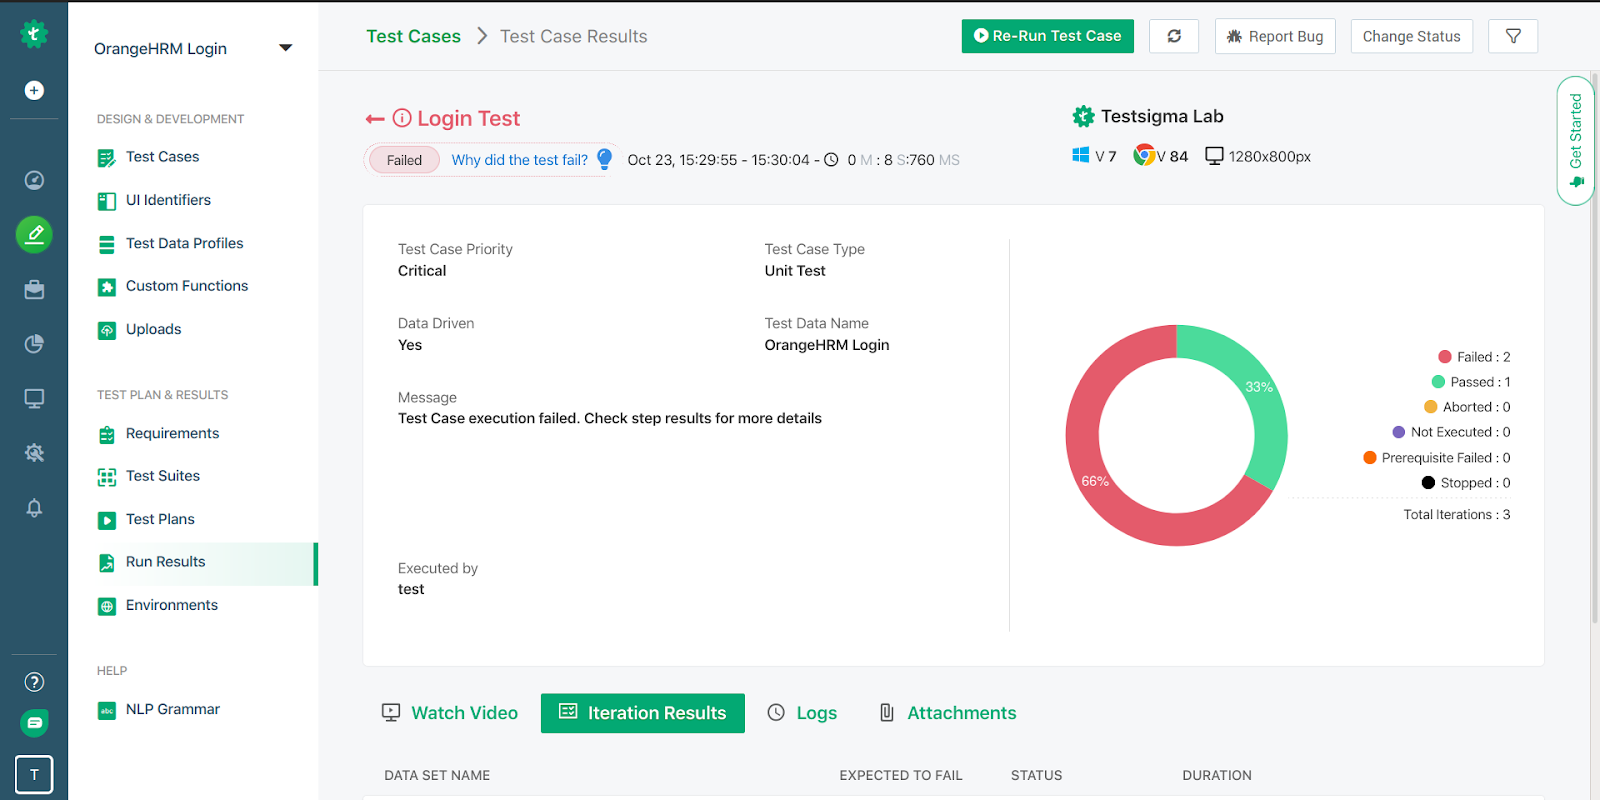
You will now be able to see the complete report of both the failed and passed Test Cases along with the Captured Screenshots.
No doubt, Testsigma is one of the easiest and most efficient ways to perform Data-Driven Automation Testing. It provides you with a number of tools and options to give you a seamless experience. Doesn’t matter if you are a newbie or an experienced Automation Testing Engineer, Testsigma’s classy User Interface along with the ability to craft Test Cases in simple plain English works like a charm. With multiple options to create highly customized Test Data Profiles and Data-Driven Test Cases, Testsigma will surely help you to save your precious time and make Customized Automation a whole new experience.
Еще об этом:
 Manual Testing Interview Questions and Answers
Types of Testing | Software Testing Types Every QA Should Know
What is Automation Testing?
Testsigma introduction
Regression Testing With Testsigma
API Testing with TestSigma
Manual Testing Interview Questions and Answers
Types of Testing | Software Testing Types Every QA Should Know
What is Automation Testing?
Testsigma introduction
Regression Testing With Testsigma
API Testing with TestSigma
 СТРУКТУРА, УПРАВЛЯЕМАЯ ДАННЫМИ, В SELENIUM WEBDRIVER | МАТЕРИАЛ ДЛЯ ТЕСТИРОВАНИЯ ПРОГРАММНОГО ОБЕСПЕЧЕНИЯ
Test Automation Framework
Automation Testing Interview Questions
СТРУКТУРА, УПРАВЛЯЕМАЯ ДАННЫМИ, В SELENIUM WEBDRIVER | МАТЕРИАЛ ДЛЯ ТЕСТИРОВАНИЯ ПРОГРАММНОГО ОБЕСПЕЧЕНИЯ
Test Automation Framework
Automation Testing Interview Questions
 ИЗУЧИТЕ РУКОВОДСТВО ПО СЕЛЕКТОРУ CSS В SELENIUM WEBDRIVER [БЕЗ ИСПОЛЬЗОВАНИЯ КАКИХ-ЛИБО ИНСТРУМЕНТОВ]